Description
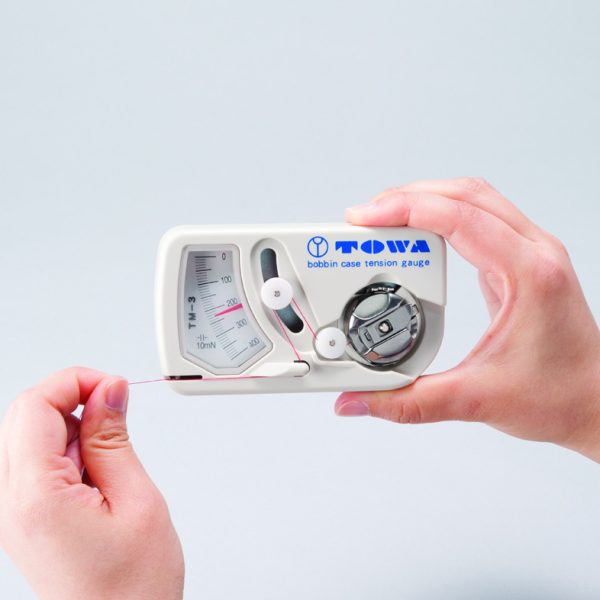
Take the guessing out of your tension with the TOWA Tension Gauge. Perfect for embroiderers, the bobbin tension gauge consistently measures and sets accurate embroidery bobbin case tension every time. The tension gauge helps eliminate the bobbin thread from poking into the top stitches, prevents the top stitches from looping, and prevents those dreaded thread breaks. With no set up required, the TOWA tension gauge is ready to use right out of the box. The size M is recommended for longarm machines and the size L is recommended for the TL machines.
Using the Tension Gauge:
-
Remove the bobbin case from your machine, making sure the bobbin thread is out of the thread slot. Then place your bobbin case with the bobbin in it into the gauge slot. Snap the bobbin case into place.
-
Wind your bobbin thread around the two pulley wheels then around the plastic hook end on your tension gauge.
-
Pull your thread slowly, paying attention to the reading on the gauge. You are looking for a correct bobbin tension between 180 to 220 grams (up to 250 grams when embroidering caps).
-
-
Note: If your gauge is shown in units of 10’s, the correct bobbin tensions should be 18 to 22 grams.
-
-
If you are out of the 180-220 gram range, turn your bobbin case spring tension screw to tighten or loosen to get back into range.
Note: Before using the Tension Gauge, make sure your bobbin case is clean. The gauge needle should provide a steady reading. If you see the gauge needle giving a bouncing or erratic reading you could have a dirty or defective bobbin case
Tip: Slide a business card back and forth under the bobbin tension spring to clear any dirt.
After adjusting your bobbin case tension, give it a test run.
-
First run a fill stitch test pattern.
-
See any top stitch looping? Tighten the main upper tension knob slightly until the looping disappears (looping can also occur if your bobbin tension is too tight).
-
Ideal thread tension for satin stitches should reveal 1/3 bobbin and 2/3 top thread color on the underside of the embroidery.